


News

🍕 Top 10 Most Popular Pizza Toppings for Restaurants & Pizzerias
You’ve perfected the dough, mastered the sauce, and sourced the finest cheese — now comes the fun part: choosing the toppings that will define your menu. Whether you’re opening a cozy neighbourhood pizzeria or curating gourmet flatbreads for an upscale venue, your topping selection shapes your brand identity and customer experience. At Hospitality Connect, we know that menu development is a careful balance between flavour, creativity, and efficiency. With limited prep space and countless ingredients to manage, deciding on your core pizza toppings can be a challenge. To help inspire your next creation, here’s our list of the Top 10 Most-Ordered Pizza Toppings — consistent best-sellers that drive repeat orders, high margins, and endless customization. 1. Pepperoni The undisputed classic. Pepperoni is a universal favourite, delivering bold spice and crisp edges that satisfy nearly every palate. From New York slices to gourmet sourdough pizzas, it’s an essential menu staple. Pairings: Classic: sausage, mushroom, onion Gourmet: hot honey, burrata, roasted garlic 2. Sausage Savory, herby, and deeply satisfying. Italian sausage adds balance and depth to any pizza, whether it’s crumbled or sliced. Pairings: Classic: green pepper, onion, mushroom Gourmet: fontina cheese, roasted red pepper, Calabrian chili 3. Mushrooms An umami powerhouse. Mushrooms bring earthy, meaty texture — a must for vegetarian or premium pizzas. Pairings: Classic: sausage, onion, chicken Gourmet: truffle oil, goat cheese, thyme 4. Extra Cheese Because sometimes, more is more. Blending mozzarella with provolone, gouda, or fontina can elevate any pie from comfort food to culinary indulgence. Pairings: Classic: pepperoni, mushroom, bacon Gourmet: honey, tomato jam, roasted pear 5. Onions Onions add sweetness, depth, and brightness. Whether caramelised or raw, they’re one of the most versatile toppings for balancing rich flavours. Pairings: Classic: sausage, green pepper, mushroom Gourmet: goat cheese, arugula, broccoli 6. Peppers Crisp, colourful, and vibrant. Bell peppers add visual appeal and a gentle sweetness that complements spicy meats and robust sauces. Pairings: Classic: onion, sausage, black olives Gourmet: cherry tomatoes, feta, basil 7. Black Olives Black olives bring a touch of the Mediterranean to your menu — briny, salty, and perfect for balancing richer toppings. Pairings: Classic: mushroom, pepper, onion Gourmet: feta, sun-dried tomato, arugula 8. Bacon Smoky and indulgent, bacon adds irresistible aroma and crunch. A proven top performer for breakfast pizzas, BBQ bases, and modern flatbreads. Pairings: Classic: sausage, chicken, extra cheese Gourmet: fig jam, butternut squash, soft egg 9. Chicken Lean, tender, and versatile. Chicken works beautifully with barbecue, pesto, or creamy white sauces — ideal for health-minded diners and flavour explorers alike. Pairings: Classic: bacon, barbecue sauce, red onion Gourmet: pesto, artichoke hearts, sun-dried tomato 10. Pineapple Sweet, bright, and unapologetically divisive. Pineapple adds tropical contrast when paired with salty or spicy ingredients. Pairings: Classic: ham, bacon, red onion Gourmet: jalapeños, prosciutto, balsamic reduction 🍴 Elevate Your Menu with Hospitality Connect Crafting the perfect pizza isn’t just about ingredients — it’s about equipment, consistency, and efficiency. At Hospitality Connect, we supply commercial pizza ovens, refrigeration units, food prep benches, and kitchen utensils designed to help chefs deliver excellence from prep to plate. 🔗 External References Pizza Today – Menu Development & Consumer Trends Food Standards Australia New Zealand (FSANZ)
Read moreNews

🔪 How to Sharpen a Serrated Knife: A Complete Guide for Chefs
Serrated knives are the unsung heroes of the kitchen. Whether slicing crusty bread, ripe tomatoes, or delicate pastries, they deliver clean, precise cuts without crushing soft textures. However, their jagged edges can make sharpening tricky — unless you know the right technique. At Hospitality Connect, we understand that maintaining your knives is essential for performance, safety, and longevity. In this guide, you’ll learn how to sharpen a serrated knife, what tools to use, and how to care for your Victorinox, Wüsthof, and Global knives for years of professional-grade performance. 🧠 Why Serrated Knives Are Different Unlike straight-edge knives, serrated blades feature scalloped “teeth” or gullets that bite into the surface of food, reducing friction and creating a cleaner slice. This design means they stay sharp longer — but when they do dull, sharpening must be precise. Common Uses for Serrated Knives Cutting crusty bread or baguettes Slicing soft fruits like tomatoes and peaches Trimming cakes and pastries Carving roasts or meats with crispy outer layers 🔗 Browse our range of professional chef knives and sharpening tools to keep your kitchen perfectly equipped. ⚙️ What You’ll Need to Sharpen a Serrated Knife To sharpen a serrated knife safely and effectively, you’ll need: Ceramic Sharpening Rod or Honing Steel — ideally tapered to fit each serration. Soft Cloth or Towel — to stabilise your knife during sharpening. Leather Strop or Fine Sandpaper (Optional) — for polishing and refining the edge. 💡 Pro Tip: Match the rod’s diameter to the size of your knife’s serrations for consistent results. For quality tools, explore our Sharpening Equipment Collection — designed for chefs who demand precision. 🔪 Step-by-Step: How to Sharpen a Serrated Knife 1. Identify the Beveled Edge Examine the blade closely — one side will be beveled (angled), while the other remains flat. Always sharpen only the beveled side. Victorinox and Wüsthof knives have a visible bevel. Global Knives, made from single-piece stainless steel, may have a subtler curve — use bright lighting for visibility. . 2. Use the Sharpening Rod Insert the ceramic rod into the first serration near the blade base. Match the rod’s angle to the bevel (typically 13–17°). Slide the rod forward and outward with light, controlled pressure. Repeat two to three times per tooth. Continue along the entire blade, maintaining the same motion and angle. Patience ensures uniform sharpness and prevents tooth damage. 3. Remove the Burr After sharpening, a small burr (metal ridge) may appear on the flat side. Lay the knife flat on a fine stone or leather strop. Gently draw the blade backward once or twice to smooth the burr. This final polish preserves cutting precision and reduces drag. 4. Clean and Dry Rinse your knife under warm water and dry immediately with a soft cloth. Even stainless steel can corrode if left damp. 🧽 Tip: Use Hospitality Connect’s professional cleaning accessories to maintain blade hygiene between uses. 🧰 Caring for Your Serrated Knife Proper care extends the life and performance of your knives: ✅ Do: Use wooden or plastic boards (never glass or marble). Hand wash only. Store in a knife block, sheath, or magnetic rack. Lightly hone every few months. ❌ Don’t: Chop or twist with serrated blades. Force cuts — let the serrations do the work. 💎 Brand-Specific Knife Care Victorinox Serrated Knives Renowned for durability, these knives respond best to fine ceramic rods. Sharpen once or twice a year and hand wash to maintain their ergonomic handles and edges.→ Learn more at Victorinox Official. Wüsthof Serrated Knives Precision-forged in Germany, Wüsthof knives hold their edge exceptionally well. Sharpen each tooth with a tapered honing steel and wipe with mineral oil for protection.→ Visit Wüsthof Australia. Global Serrated Knives Lightweight and balanced, Global knives feature a hard stainless-steel body. Use a fine ceramic rod, not a coarse one, then polish for a mirror finish.→ Explore Global Knives Australia. ⚡ How Often Should You Sharpen a Serrated Knife? Because serrated edges stay sharp longer than straight blades: Home chefs: Every 12–18 months Professional kitchens: Every 6–12 months, depending on use In between, maintain alignment with a fine honing steel or ceramic rod. 🪶 Pro Tip: Protect Your Investment Apply food-safe oil after cleaning to prevent oxidation. Never store knives loosely in drawers — it dulls edges and poses injury risks. Rotate knives for different tasks to reduce wear. Find professional knife storage solutions to protect your investment. 🔍 FAQs: Serrated Knife Sharpening 1. Can you sharpen a serrated knife at home?Yes, with the right tools — a ceramic sharpening rod or tapered steel. Always sharpen the beveled edge and avoid aggressive pressure. 2. How often should I sharpen a serrated knife?Most serrated knives only need sharpening every 12–18 months (home use) or 6–12 months (commercial kitchens). 3. Should I sharpen both sides of the blade?No. Only sharpen the beveled side of a serrated knife. The flat side should remain untouched, except for light deburring. 4. What’s the best tool to sharpen serrated knives?A ceramic sharpening rod or tapered honing steel works best, fitting perfectly into the serrations without damaging the blade. 5. Can I use an electric sharpener?Avoid it. Electric sharpeners can flatten or deform serrations. Manual methods are safer and more precise. 6. Where can I buy professional sharpening tools?Visit Hospitality Connect for Australian-standard sharpening rods, steels, and knife care accessories. 7. What’s the difference between honing and sharpening?Honing realigns your blade between uses, while sharpening removes material to recreate the edge. Serrated knives typically need more honing than sharpening. 8. Can dishwashers dull serrated knives?Yes — heat, moisture, and vibration can damage edges and handles. Always hand wash and dry immediately. ✨ Final Thoughts Sharpening a serrated knife takes patience and precision — but the results speak for themselves. A well-maintained serrated blade slices effortlessly, looks professional, and lasts for years. At Hospitality Connect, we’re proud to supply Australia’s culinary professionals with premium knives, sharpening tools, and kitchen accessories from trusted brands like Victorinox, Wüsthof, and Global. 🛠️ Stay sharp with Hospitality Connect’s Knife Collection — trusted by chefs across Australia. 🔗 External References Victorinox Official Website Wüsthof Official Website

🎃 How to Cut the Perfect Pumpkin for Halloween
Halloween is the perfect time to unleash your creativity in the kitchen. From spooky table displays to glowing jack-o’-lanterns, carving the perfect pumpkin is an essential part of the fun. At Hospitality Connect, we know that the secret to a smooth, safe, and stunning pumpkin carving experience lies in having the right tools — including Wüsthof and Victorinox knives, Ingredient Bins, and Chef Inox Frying Pans. Whether you’re decorating a restaurant, styling a café display, or crafting something festive at home, here’s how to cut the perfect pumpkin like a professional. 🧡 Step 1: Choose the Right Pumpkin Start by selecting a pumpkin that’s: Smooth and firm – for easier carving and fewer bumps. Flat-bottomed – so it stays steady while you cut. Medium-sized – large enough for creativity, yet easy to handle. 💡 Pro Tip: Look for pumpkins with a healthy stem and no soft spots — this means it’ll last longer once carved. 🔪 Step 2: Get Your Tools Ready A perfect pumpkin cut begins with sharp, reliable tools. Here’s what you’ll need: Wüsthof Chef’s Knife – Ideal for making the initial lid cut with precision and strength. Victorinox Paring Knife – Perfect for carving details and delicate shapes. Large metal spoon or scoop – To remove seeds and fibres. Cutting board – For safety and stability. Ingredient Bin – From Hospitality Connect, to collect seeds, scraps, or compost material neatly. 🧑🍳 Safety First: Always cut away from your hands and keep your knife handles dry. The balanced weight and sharpness of Wüsthof and Victorinox knives make carving easier and safer. ✏️ Step 3: Design Your Masterpiece Before you make the first cut, sketch your design on the pumpkin using a washable marker or pencil. Classic jack-o’-lantern faces bring nostalgia and fun. Geometric patterns or logos are ideal for restaurant displays. Elegant silhouettes (like bats, moons, or haunted houses) add a refined touch to hospitality settings. Tip: If you’re creating multiple pumpkins for an event or restaurant display, plan designs of varying heights and sizes for visual impact. 🪓 Step 4: Cut the Lid Hold your Wüsthof Chef’s Knife at a 45° angle and cut a circle around the stem. The inward angle helps the lid rest securely and prevents it from falling in. Lift the lid carefully using the knife tip or a sturdy spoon. 🔥 Alternate method: Cut the base instead of the top — it makes lighting easier and gives a cleaner, more professional finish. 🎃 Step 5: Scoop and Clean Using your scoop or spoon, remove all the seeds and stringy fibres.A clean pumpkin inside will stay fresh longer and prevent odour. Use an Ingredient Bin from Hospitality Connect to store the seeds for roasting later — they make an excellent snack or garnish. 🌿 Chef’s Hack: Sprinkle a pinch of salt or brush the inner walls with lemon juice to help preserve your pumpkin for longer displays. ✂️ Step 6: Carve with Precision Here’s where the magic happens! Use your Victorinox Paring Knife for precision cuts — its fine tip is perfect for detailed shapes. For larger areas, switch to your Wüsthof Utility Knife for smooth, confident slicing. Always cut small sections first, working from the centre outward to avoid breakage. 🧠 Pro Tip: Keep your knives sharp — dull blades require more force and increase the risk of slipping. A clean, sharp cut creates smoother edges and better detail. 💡 Step 7: Light It Up Once you’ve finished carving, place a small LED light or tealight candle inside your pumpkin.If using a real flame, set your pumpkin on a Chef Inox Frying Pan or heat-safe tray to protect your surface and catch any drips. For venues, LED lights are a safer, long-lasting option that keeps your display glowing all night. 🌟 Step 8: Preserve and Display Store your pumpkin in a cool, dry area, away from direct sunlight. Mist the carved edges with water daily to keep them hydrated. Use Ingredient Bins to store any pre-cut pumpkins or smaller decorative gourds overnight. For commercial displays, rotate pumpkins every few days to keep your setup looking fresh and professional. 🎃 Bonus Tip: Make It Sustainable Don’t toss those pumpkin scraps! Here’s how to make the most of them: Roast the seeds with olive oil and sea salt for a crunchy snack. Use leftover pumpkin flesh in soups, risottos, or gnocchi. Compost the rest to reduce kitchen waste. At Hospitality Connect, we believe great kitchens combine creativity, efficiency, and sustainability — especially during seasonal celebrations. 👻 Final Thoughts Cutting the perfect pumpkin for Halloween is all about skill, care, and the right tools. With Wüsthof and Victorinox knives, every cut is smooth, safe, and precise. Keep your space tidy with Ingredient Bins, and finish your masterpiece with a Chef Inox Frying Pan display for a professional touch. Whether you’re crafting a spooky centrepiece or a full Halloween display, Hospitality Connect has everything you need to make this season both festive and efficient. ✨ Happy Halloween from the Hospitality Connect team! 🎃

🍝 Create Perfect Pasta with the Sirman Pasta Maker: Recipes & Pro Kitchen Essentials
There’s something truly special about fresh pasta — the silky texture, the perfect bite, and the satisfaction of crafting it from scratch. For chefs, it’s not just about the recipe; it’s about precision, consistency, and using the right tools to achieve perfection every time. At Hospitality Connect, we know that a professional kitchen relies on equipment that delivers reliability, speed, and quality. That’s why chefs across Australia trust brands like Sirman Chef Inox and our range of Ingredient Binsto produce restaurant-quality pasta with efficiency and style. 🍳 Why Every Kitchen Needs the Sirman Pasta Maker The Sirman Pasta Maker is engineered for performance and perfection. Built for commercial kitchens, it produces smooth, consistent pasta in a variety of shapes — from delicate ravioli to silky tagliatelle — all while standing up to daily high-volume use. Key Benefits: Consistency: Every batch is evenly kneaded and extruded. Versatility: Interchangeable dies create a range of pasta styles. Efficiency: Designed for continuous operation in busy kitchens. Durability: Stainless-steel construction ensures hygiene and long-term reliability. Pair it with Ingredient Bins for streamlined organisation and Chef Inox Frying Pans for perfect sauce finishing. 🍝 Recipe 1: Fresh Egg Tagliatelle with Creamy Mushroom Sauce A classic Italian favourite that showcases the beauty of handmade pasta. Ingredients: 400g “00” flour 4 large eggs 1 tbsp olive oil Pinch of salt 2 tbsp butter 200g mushrooms, sliced 1 clove garlic, minced 150ml cream Parmesan and parsley to garnish Equipment: Sirman Pasta Maker – for flawless pasta sheets Ingredient Bin – to store flour and portioned dough Chef Inox Frying Pan – for sautéing and sauce finishing Method: Combine flour, eggs, oil, and salt. Knead until smooth. Roll dough through the Sirman Pasta Maker to your desired thickness. Cut into tagliatelle. Store extra flour in an Ingredient Bin to stay organised. In your Chef Inox Frying Pan, melt butter, sauté garlic and mushrooms, and add cream. Boil pasta until al dente, toss with sauce, and finish with parmesan. 💡 Pro Tip: The Sirman Pasta Maker ensures consistent thickness and texture for that perfect bite. 🍅 Recipe 2: Spinach & Ricotta Ravioli with Burnt Butter Sage Sauce A refined vegetarian dish that highlights precision and elegance. Ingredients: Pasta Dough: 400g flour, 4 eggs, pinch of salt Filling: 200g ricotta, 100g cooked spinach, nutmeg, salt, pepper Sauce: 100g butter, 6 sage leaves, grated parmesan Equipment: Sirman Pasta Maker – for even, delicate pasta sheets Chef Inox Frying Pan – perfect for browning butter evenly Ingredient Bin – for storing filling or dough Method: Roll dough with the Sirman Pasta Maker until thin and even. Add spoonfuls of filling, top with another sheet, and seal. Cook ravioli until they float to the surface. In a Chef Inox Frying Pan, brown butter with sage leaves. Toss ravioli gently in the sauce and serve with parmesan. 💡 Pro Tip: The Sirman Pasta Maker’s precision ensures ravioli cook evenly and stay perfectly sealed. 🧂 Professional Pasta-Making Tips for Chefs Use Ingredient Bins to organise flour and dough efficiently. Rest your dough to relax gluten for smoother sheets. Cook pasta in plenty of salted water and finish in the sauce for enhanced flavour. Clean your Sirman Pasta Maker regularly to maintain performance and hygiene. 🔧 Equipment That Elevates Your Kitchen At Hospitality Connect, we stock premium commercial kitchen tools designed for reliability and consistency: Sirman Pasta Makers Italian engineering for authentic fresh pasta. Chef Inox Frying Pans renowned for superior heat distribution. Ingredient Bins & Storage ideal for organisation and hygiene. Streamline your pasta-making process and deliver world-class results with equipment trusted by Australia’s top chefs. 👨🍳 FAQs: Pasta Tools & Equipment 1. What makes the Sirman Pasta Maker ideal for professional kitchens?The Sirman Pasta Maker offers consistent dough texture and durability for continuous commercial use. Its stainless-steel design ensures hygiene and efficiency in busy environments.🔗 Learn more: Sirman Official 2. How should I clean and maintain my Sirman Pasta Maker?Always clean the machine after use with a dry brush or cloth — never with water. Regular maintenance prevents dough buildup and extends lifespan.🔗 Explore Hospitality Connect Cleaning Accessories 3. Are Chef Inox Frying Pans suitable for induction cooktops?Yes. Chef Inox Frying Pans are made from high-quality stainless steel, making them suitable for all cooktops, including induction. 4. What Ingredient Bins are best for pasta prep?Opt for airtight Ingredient Bins to keep flour and dough fresh. Our bins meet Australian food safety standards and improve prep efficiency. 5. Can I use Sirman Pasta Makers in small restaurants or cafes?Absolutely. The Sirman range is ideal for both high-volume operations and smaller boutique kitchens. It ensures consistency while saving prep time. 6. Do you offer bulk or trade pricing for kitchen equipment?Yes. Hospitality Connect provides trade pricing for registered hospitality businesses and venue fit-outs across Australia. ✨ Final Thoughts Fresh pasta is more than a recipe — it’s a craft that defines quality and care in your kitchen. With the Sirman Pasta Maker, Chef Inox Frying Pans, and Ingredient Bins from Hospitality Connect, you’ll achieve professional consistency, efficiency, and exceptional flavour in every service.

How to Stop Pizza from Sticking to the Peel: 10 Proven Tips from the Pros
Ever launched your pizza into the oven only to have it stick stubbornly to the peel? You’re not alone. Dough tearing, toppings sliding off, and sticky bases are some of the most common frustrations in commercial kitchens. The good news — with the right pizza tools, flour, and technique, you can prevent sticking for good. At Hospitality Connect, we’ve seen this problem in busy pizzerias across Australia, and we know exactly how to fix it. Follow these 10 expert tips to keep your pizzas sliding effortlessly every time. 🔧 Quick Tips to Stop Pizza Sticking Use the right pizza peel— wooden for loading, metal for turning. Dust lightly with semolina or cornmeal. Keep your peel clean, dry, and cool. Launch your pizza within 90 seconds of topping. Always preheat your pizza stone or steel 1️⃣ Choose the Right Pizza Peel: Wooden vs. Metal 🍞 Wooden Peels — For Raw Dough A wooden pizza peel is ideal for loading pizzas into the oven. Its slightly rough surface prevents sticking by absorbing light moisture from the dough. Dust it with semolina or durum wheat flour before placing your base — but work quickly. Even the best dusting can’t stop dough from sticking after a few minutes. 🔥 Metal Peels — For Cooked Pizza Once your pizza starts to crisp, switch to a metal peel. Its thin edge slides under the base easily, perfect for turning or removing baked pizzas. However, raw dough will cling to it — so use wood for prep, metal for retrieval. 💡 Explore our Professional Pizza Peels & Paddles— trusted by chefs and commercial kitchens across Australia. 2️⃣ Prep Your Peel the Right Way The type of flour you use is crucial. Professionals prefer semolina or durum wheat flour because they stay dry and roll under the dough rather than absorbing moisture. A light dusting creates a smooth slide — too much can burn and add bitterness. 3️⃣ Keep It Dry Moisture is your biggest enemy. A damp peel turns flour into glue. Always start with a cool, dry surface, and never wipe your peel with a wet cloth before use. 4️⃣ Get the Dough Right Sticky dough is the number one culprit. Aim for a dough that’s soft yet elastic — it should spring back when pressed. Use strong bread flour and knead thoroughly for good gluten development. ⚙️ Save time in prep with a Commercial Dough Mixer— designed for consistency and efficiency in busy kitchens. 5️⃣ Shape on the Bench — Not the Peel Stretch and shape your dough on a floured workbench instead of the peel. This prevents buildup and lets you maintain control over the pizza’s size and thickness. Once shaped, transfer it to your peel, add toppings, and bake immediately. 6️⃣ Don’t Let the Pizza Sit Too Long Once your base and toppings are on the peel, time is ticking. If you wait longer than 90 seconds, moisture begins to soften the base, causing sticking. Work quickly — sauce, toppings, and launch. 7️⃣ Keep Toppings Light and Even Heavy toppings lead to soggy dough. Apply a thin, even layer of sauce and pre-cook watery ingredients like mushrooms or spinach. This ensures even cooking and prevents sticking. 🍅 Find Chef Inox Frying Pans— ideal for pre-cooking toppings and finishing sauces. 8️⃣ Preheat Your Pizza Stone or Steel A hot surface is essential for a crisp, non-stick base. Preheat your pizza stone or steel for at least 45 minutes before baking. The intense heat sets the crust instantly, helping your pizza slide off cleanly every time. 9️⃣ Master the Slide Technique Launch your pizza with a quick forward push and pull — not a shake. Keep your peel level with the oven surface, and let gravity do the work. Practice with an empty dough on a cold stone to perfect your timing and movement. 🔟 Clean Your Peel After Every Use Burnt flour and cheese cause drag. For wooden peels, use a dry brush — never soak them. For metal peels, wipe with a damp cloth, dry completely, and sanitise with Nowchem Cleaning Products A clean peel guarantees smoother slides and longer tool life. 🍽️ Finding the Right Pizza Peel or Paddle When selecting your pizza peel, consider: Shape: Round for flexibility, square for support. Handle Length: Short for compact ovens, long for deep deck or conveyor ovens. Material: Wood for loading raw dough, metal for turning and serving. Browse Hospitality Connect’s Pizza Equipment Range— featuring peels, stones, cutters, paddles, and prep tools designed for professional use. 🔗 External References Pizza Today — Pro Tips for Perfect Pizza Dough Food Standards Australia New Zealand (FSANZ) 🍕 Frequently Asked Questions (FAQs) 1. Should I spray my pizza peel?No — oil makes the dough stick more and can burn in the oven. Keep your peel dry and dust lightly with semolina or cornmeal. 2. What flour stops dough from sticking?Use semolina, durum wheat, or fine cornmeal. These grains roll beneath the dough instead of absorbing moisture, keeping it mobile. 3. What’s the best pizza peel to prevent sticking?A wooden peel for raw dough and a metal peel for baked pizza. This combination guarantees smooth launches and effortless retrieval.👉 See our Professional Pizza Peels 4. How can I avoid pizza sticking to the peel?Keep your peel dry, dust lightly, and work fast. Launch the pizza within 90 seconds after topping to prevent moisture absorption. 5. Should I oil my pizza peel?Never. Oil burns and leaves sticky residue. Clean your peel after every use using Nowchem Cleaning Products for best hygiene and performance.
The Ultimate Guide to Wine Storage in Hospitality: From Fridge to Cellar
Correct wine storage is part of professional service — it protects flavours, reduces waste, and preserves the value of every bottle. Whether you operate a restaurant, bar, hotel, or tasting venue, knowing when to use a regular fridge versus a commercial wine fridge or cellar is essential for maintaining quality. A standard fridge is suitable for short-term storage of open bottles. A wine fridge, cooler, or cellar is required for long-term storage. Store wine by type & by service timeline. Should Wine Be Refrigerated? Yes — but with care and intention. Some wines require chilling, others prefer cellar temperatures, and long-term storage demands stability. Temperature affects aroma, mouthfeel, longevity, and guest perception. Proper storage: Prevents oxidation Protects cork integrity Preserves alcohol structure and aroma Maintains serving readiness 1. Use the Fridge Smartly A regular fridge works well only for open bottles or short-term service. For unopened bottles, a dedicated wine cooler or cellar ensures stable temperature and humidity. Key tips: Lay bottles sideways to keep corks moist Always reseal opened bottles Avoid frequent temperature changes Keep away from fridge door vibrations & light 2. Store by Wine Type Different wines have different storage requirements: Wine Type Best Conditions Light Reds (Pinot Noir) Slightly chilled, short-term in fridge Full-bodied Reds (Cab Sauv) Cellar temperature, not household fridge Full-bodied Whites Chilled, serve fresh — avoid long-term kitchen fridge storage Rosé Best chilled; short-term fridge is fine Sparkling Very cold; airtight stopper essential post-opening Fortified Wines Stable when unopened; chill after opening 3. Handling Opened Bottles Correctly Once a bottle is opened, oxidation begins immediately. Best practice for hospitality service: Use a high-quality stopper or vacuum system Refrigerate open bottles (even reds after service hours) Serve within 1–5 days depending on varietal Rotate stock to minimise spoilage This protects both guest experience and venue profitability. 4. Short-Term vs Long-Term Storage Timeline Best Storage Method Short-Term (ready to serve) Standard fridge or countertop cooler Long-Term (cellaring or ageing) Dedicated commercial wine fridge or cellar Short-term storage ensures temperature accuracy for immediate service.Long-term storage preserves investment wines and premium stock. 5. Avoid Temperature Fluctuation Wine quality suffers most when it moves in and out of temperature zones. Vibrations, frequent fridge door openings, and sudden heat exposure accelerate spoilage. For consistent quality: Keep bottles away from unstable cold zones Do not store premium wines in household fridges Maintain a stable wine service temperature Conclusion So, should you put wine in the fridge?Yes — but only the right wines, stored with the right intention, for the right duration. Correct storage protects flavour, extends shelf life, and elevates service standards — a must in every professional hospitality setting. Upgrade Your Wine Storage with Hospitality Connect Whether you need compact fridges for front-of-house service or full cellar-grade refrigeration for maturing stock, Hospitality Connect provides commercial wine fridges and premium wine storage solutions built specifically for the hospitality industry — not residential use. 💡 Serve every glass as the winemaker intended. Frequently Asked Questions Should wine be refrigerated?Yes — sparkling, white and rosé wines should be chilled. Reds are kept at cellar temperature and lightly cooled before service. Can unopened bottles be kept in a regular fridge?Only short-term. For anything longer, use a wine fridge to avoid cork damage and flavour loss. Which wines should not be refrigerated?Full-bodied reds intended for ageing should NOT be stored in a kitchen fridge. Is ice in red wine acceptable?It’s acceptable casually, but it dilutes flavour. Frozen grapes are a better alternative in hospitality service. When is the best time to serve red wine?At serving temperature, after slight aeration. This preserves aroma, structure, and mouthfeel.

The Ultimate Guide to Choosing the Right Glass for Every Drink
In hospitality, presentation is never “just presentation” — it’s part of the product. The right glass doesn’t just hold a drink, it enhances flavour, aroma, and customer experience, while elevating your venue’s perceived quality. From cocktails to champagne, beer to premium wine service — the glass you choose directly influences the guest’s first impression and overall enjoyment. That’s why leading venues invest in professional-grade glassware from trusted brands like Bormioli Rocco, Crown, D-Still, and RCR — all available through Hospitality Connect. 🍷 Why the Right Glass Matters Benefit Why it Matters in Service Aroma Certain shapes help concentrate or release aromas Temperature control Stemmed glassware stops heat from hands Carbonation Champagne & beer retain bubbles better in the right glass Perceived value Premium glass = premium pricing Presentation Essential for social media and “Instagrammable” moments 🥂 Types of Glasses & What They’re Used For 1️⃣ Wine Glasses Wine glass size and shape change the tasting experience. Glass Type Best For Why Red Wine (Large Bowl) Shiraz, Merlot, Cabernet Opens aromas & softens tannins White Wine (Smaller Bowl) Sauvignon Blanc, Chardonnay, Pinot Gris Keeps temperature stable Stemless Casual service & outdoor dining Stylish & durable Recommended Brands:RCR (premium Italian crystal), Crown (commercial durability), Bormioli Rocco (European elegance for everyday service) 2️⃣ Champagne & Sparkling Glasses Not all bubbles are equal — neither are the glasses. Glass Type Best For Why Flute Prosecco, Champagne Preserves carbonation & elegance Tulip High-end sparkling Enhances aroma + mousse Coupe Vintage/Classic cocktails Luxurious look for cocktails or sparkling Recommended Brands:RCR (crystal clarity), D-Still (impact-resistant for events), Bormioli Rocco (classic hospitality favourite) 3️⃣ Cocktail Glasses Every cocktail has a personality — the glass highlights it. Glass Type Drinks Why Martini Martini, Cosmopolitan Sharp rim, clean aromatics Highball/Collins Mojito, Spritz, Gin mixers Better ice stacking + volume Coupe Sours, champagne cocktails Elegant & stemmed presentation Tumbler/Old Fashioned Negroni, Whiskey cocktails Heavier base for spirit-forward drinks Recommended Brands:D-Still (huge range of cocktail shapes), Crown (everyday commercial service), RCR (high-end bar presentation) 4️⃣ Beer Glasses Shape influences head retention, bubbles and drinking experience. Glass Type Best For Pint/Stein Lagers & draught beer Tulip Craft & aromatic beers Stemmed beer glass Belgian & premium pours Recommended Brands:Crown (pub-grade durability), D-Still (stackable & outdoor-friendly options) ✅ Why Professional Venues Choose These Brands Brand Key Strength Bormioli Rocco Stylish Italian design & everyday durability RCR Lead-free crystal clarity for premium service D-Still Wide range + shatter-resistant options Crown Australian hospitality favourite for reliability Hospitality Connect – Your Source for Professional Glassware From boutique bars to large venues, Hospitality Connect supplies commercial-grade glassware tailored for service conditions: ✅ Bar, restaurant & hotel fitout-ready✅ Premium & entry-level options✅ Fast turnaround on event season orders✅ Access to world-trusted glass brands Final Thoughts The right glass can turn a standard beverage into a premium experience — and customers happily pay more for that upgrade. Whether you’re refreshing your bar setup or gearing up for spring racing season and Melbourne Cup events, investing in quality glassware helps your venue deliver professional presentation and lasting guest satisfaction. Hospitality Connect proudly supplies Bormioli Rocco, Crown, D-Still and RCR — trusted by Australia’s leading cafés, bars, restaurants and hotels.
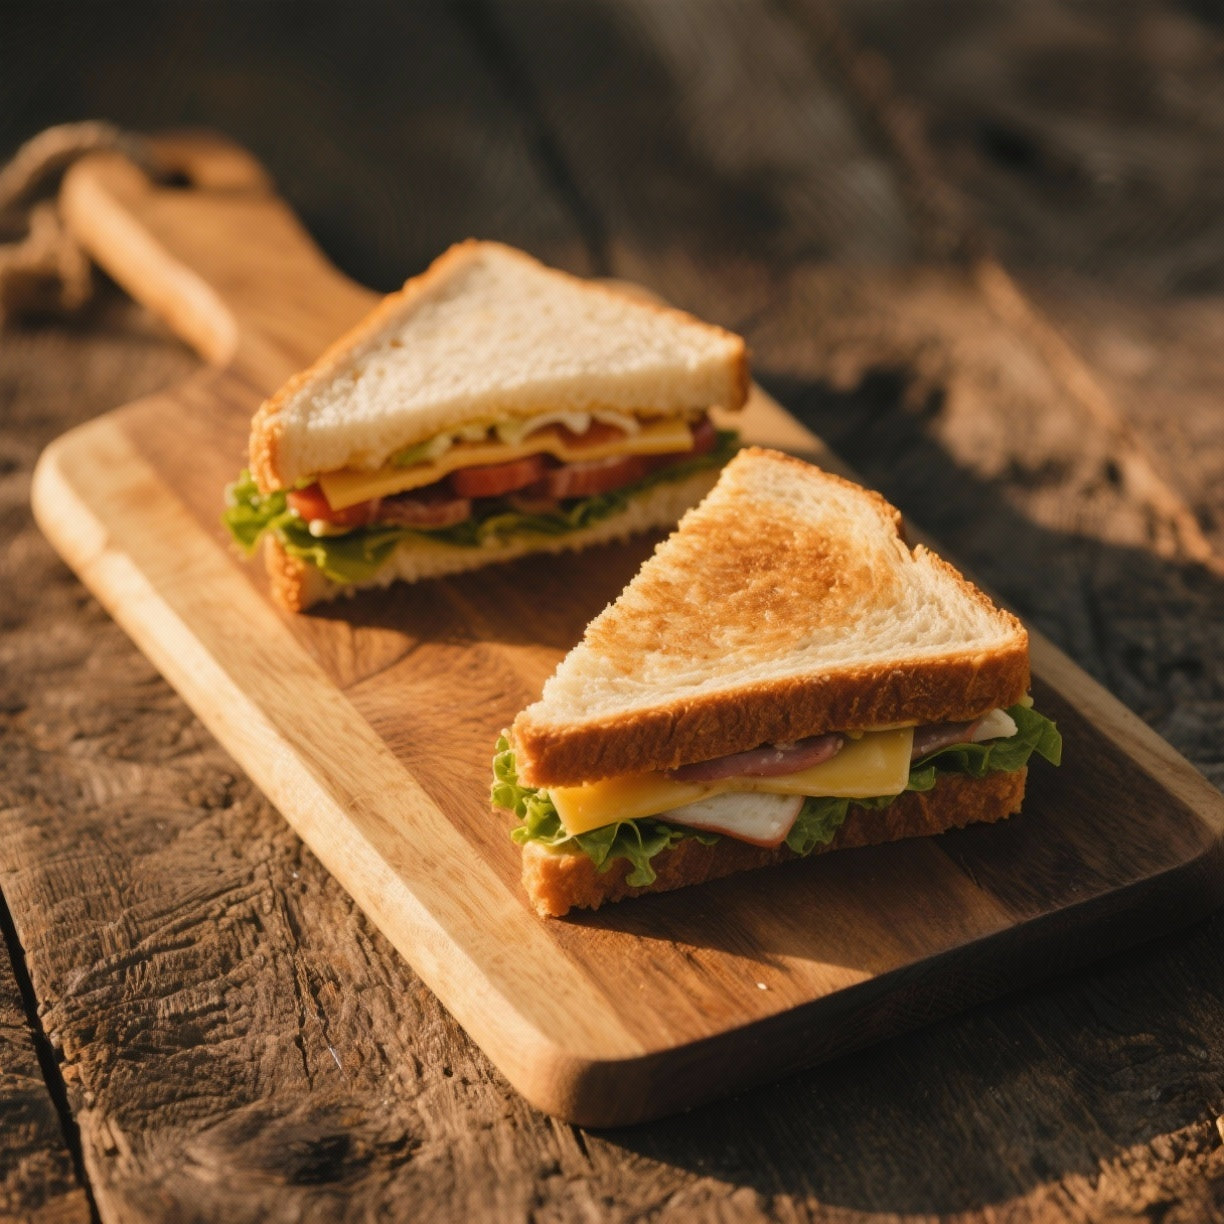
🥪 Perfect Club Sandwich Recipe for Cafés & Commercial Kitchens
How to Make a Classic Club Sandwich (The Professional Way) A Club Sandwich is a timeless café favourite — layered, hearty, and visually appealing on the plate. When prepared with the right technique and the right commercial kitchen equipment, it delivers consistent results that your customers will keep coming back for. Whether you’re serving breakfast, lunch, or a quick grab-and-go menu, mastering the club sandwich is essential for café and restaurant operators. At Hospitality Connect, we show chefs and kitchen operators how to use the right tools to raise both presentation and efficiency. ✅ Ingredients (Serves 1) Ingredient Quantity Sourdough or thick white toast 3 slices Chicken breast or deli turkey 80–100g (sliced) Crispy bacon 2–3 rashers Cheddar or Swiss cheese 1–2 slices Tomato 2–3 slices Lettuce (cos or iceberg) 3–4 leaves Mayonnaise 1–2 tbsp Butter (optional) 1 tsp Salt & pepper To taste 🍳 Method Prepare the ProteinIf using deli turkey or roasted chicken breast, ensure thin consistency and even slices.Using a Brice Meat Slicer ensures every portion is clean, uniform, and café-ready — reducing waste and improving plating consistency. Keep Your Ingredients FreshStore your protein, cheese, and fresh produce in a Skope Refrigeration unit for maximum food safety and ideal serving temperature. Proper refrigeration keeps texture crisp and flavours fresh. Toast the BreadToast all 3 slices until golden brown. Lightly butter if desired. Assemble Layer by Layer Spread mayo on the first slice. Add lettuce, chicken/turkey, and cheese. Top with the second slice, spread with mayo. Add bacon and tomato slices. Crown with the final slice of toast. Cut & PresentUse a Victorinox knife for a clean, sharp diagonal cut — the hallmark café presentation. The precision blade prevents crushing, so the sandwich layers remain clean and structured. Secure & ServeSecure with toothpicks or sandwich skewers. Serve with chips or salad for café plating appeal. 📌 Commercial Kitchen Tips For Better Consistency Tip Equipment Advantage Perfect slice thickness every time Brice Meat Slicer Stay safe and efficient during prep Victorinox Knives Consistently fresh proteins and veg Skope Refrigeration Trusted supply and service Hospitality Connect Why Chefs Love This Sandwich ✔ Fast prep on busy service✔ High profit margin✔ Travel-friendly for takeaway✔ Easy to customise with aioli, avocado, smoked meats, etc. Final Thoughts If you're operating a café, bistro, hotel kitchen or deli, sourcing the right equipment is just as important as the ingredients. Through Hospitality Connect, venues can access commercial-grade tools like the Brice Meat Slicer, Victorinox Knives, and Skope Refrigeration — ensuring food quality, presentation, and service remain consistently high.

How Slushie Machines Work: A Complete Guide for the Hospitality Industry
A slushie machine cools a liquid mixture inside a freezing chamber while constantly stirring it. This motion prevents the mixture from turning into solid ice, creating that perfectly smooth, semi-frozen texture customers love. Inside, the freezing cylinder, mixing blades, and cooling system work together to maintain a delicate balance of temperature and motion. Sugar content, room temperature, and the cooling technology — whether it’s air-cooled or water-cooled — all influence how quickly the slush forms and how consistent it stays during service. Step-by-Step: The Slushie Making Process 1. Preparing the Perfect Slush Mixture Getting the mix right is the first step toward consistent quality. Measure syrup, water, and sugar accurately. Keep sugar content high enough to prevent solid freezing. Adjust alcohol levels when making frozen cocktails — too much lowers the freezing point. Brands like Cofrimell CAB and Icetro are known for handling a wide variety of beverages — from classic fruit mixes to creamy frappes and cocktails — with precision cooling and consistent output. 2. Loading the Mixture into the Machine When filling your machine: Never overfill — leave space for expansion. Use a jug or bottle to minimise spills. Always follow the manufacturer’s filling guidelines. Brades Emainox systems are built for convenience, featuring ergonomic tanks and drip-free dispensing for smooth operation during busy shifts. 3. Freezing Chamber and Temperature Control The heart of every slushie machine is its freezing chamber. Inside, the compressor and evaporator chill the liquid until it reaches slush consistency. Key factors that affect performance include: Ambient temperature in the service area. Sugar and syrup concentration. Maintenance of the cooling coils and mixing blades. Reliable machines like Cofrimell CAB and Icetro models ensure fast freeze times, perfect texture, and minimal downtime — ideal for high-volume hospitality venues. 4. Creating the Perfect Slush Texture Consistency is everything. The machine’s rotating blades prevent ice crystals from clumping together, producing an even texture every time. Constant movement ensures smooth freezing. Even temperature distribution keeps texture uniform. Staff involvement is minimal — the machine handles it all. This is where the precision engineering of brands like Icetro really shines, guaranteeing that every pour meets professional quality standards. 5. Serving the Finished Product When the slush is ready, serving is simple: Pull the tap or lever to dispense into a cup or glass. Add syrups, juices, or alcohol for creative variations. Serve immediately for optimal flavour and texture. Brades Emainox and Cofrimell CAB machines feature fast-dispense taps and easy cleaning systems, allowing your team to serve more customers quickly — especially during peak hours. 6. Cleaning and Daily Maintenance Routine cleaning is vital for maintaining hygiene, preventing malfunctions, and extending machine life. Empty the tank daily and rinse with clean water. Wash components using mild detergent and warm water. Schedule deep cleans weekly for best results. High-end commercial models from Cofrimell CAB and Icetro are designed for easy maintenance, with removable parts and simple disassembly to save staff time. 7. Tips for Better Performance Small adjustments can have a big impact on output and efficiency: Pre-chill mixtures before pouring them into the machine. Avoid direct sunlight or hot areas near the machine. Allow 20–40 minutes for optimal freezing. Keep filters and vents clear for better airflow. These steps ensure your slushie or frozen drink station operates efficiently — reducing waste, improving uptime, and keeping customers happy. Beyond Slush: Expanding Your Menu A commercial slushie machine isn’t just for traditional frozen drinks. Versatile models from Brades Emainox, Cofrimell CAB, and Icetro can handle: Frozen coffees and frappes. Alcoholic slush cocktails and mocktails. Smoothies and seasonal specials. Adding frozen beverages to your lineup is one of the simplest ways to increase revenue and customer satisfaction in any hospitality business. Why Choose Hospitality Connect for Slushie Machines At Hospitality Connect, we supply and support world-leading brands like Brades Emainox, Cofrimell CAB, and Icetro, offering a range of commercial slushie machines designed for performance, durability, and ease of use. Whether you’re running a café, bar, or entertainment venue, our experts can help you choose the right equipment, set up efficient service systems, and maintain your machines for long-term reliability. Final Thoughts So, how does a slushy machine work? It’s a balance of science and precision — chilling, mixing, and preventing the liquid from freezing solid to create the perfect frozen drink. With the right equipment from Hospitality Connect — featuring premium brands like Brades Emainox, Cofrimell CAB, and Icetro — you can serve consistently high-quality drinks that delight customers and boost profits year-round.

The Power of Pressure Frying: Why Every Commercial Kitchen Needs a Henny Penny Pressure Fryer
Fried food is one of the most popular menu items across the hospitality industry. From perfectly golden chips to crispy fried chicken, frying is a staple in almost every commercial kitchen. While traditional frying methods like pan frying or deep frying are well-known, pressure frying is quickly becoming the preferred choice for professional chefs who want to serve deliciously crispy yet tender fried food — faster and with less oil. At Hospitality Connect, we’re proud to supply leading commercial equipment like the Henny Penny Pressure Fryer, designed to help hospitality venues achieve consistently exceptional results. What Is Pressure Frying? Pressure frying combines the principles of deep frying with the technology of a pressure cooker. Food is submerged in hot oil inside a sealed, pressurised chamber. Once the lid is locked, the internal pressure rises, allowing water and oil within the food to reach temperatures higher than 100°C. This process cooks food faster, sealing in natural juices and flavour while creating that signature crispy, golden exterior. The result? Fried food that’s juicier, more tender, and more flavourful — ideal for busy commercial kitchens that value both quality and efficiency. Think of it as deep frying reinvented — faster, cleaner, and more consistent. Common Frying Methods Explained While pressure frying is revolutionising the way many kitchens operate, it helps to understand how it compares to traditional frying techniques. 1. Deep Frying In deep frying, food is fully submerged in hot oil. It’s a popular method for dishes like chicken, chips, and donuts where an even, crispy finish is desired. Open fryers or countertop fryers are commonly used for this technique. 2. Shallow Frying Shallow frying involves partially submerging food in oil and flipping it for even cooking. It’s ideal for breaded foods, fritters, or cutlets, using sauté pans or skillets. 3. Pan Frying Pan frying uses a thin layer of oil to cook food, requiring constant attention and turning. It’s a quick method for dishes like eggs, vegetables, and smaller portions. Skillets and flat pans are the go-to tools for this approach. Pressure Frying vs. Traditional Frying Here’s how pressure frying outperforms traditional open-air frying methods: Feature Pressure Frying Traditional Frying Cooking Chamber Sealed and pressurised Open to air Cooking Speed Faster due to higher internal temperature Slower, limited by standard boiling point Moisture Retention Excellent – steam stays inside food Lower – juices escape during frying Oil Absorption Reduced – shorter cooking time means less oil uptake Higher – food spends more time in oil Texture Crispy exterior, tender and juicy interior Crispy outside, but often drier inside Best For High-volume fried foods (e.g., chicken, tenders) Small-batch items (e.g., chips, tempura) The Henny Penny Pressure Fryer is designed specifically to deliver these advantages in commercial settings. Its advanced design ensures consistent temperature control, reduced oil usage, and unbeatable product quality. Why Commercial Kitchens Are Switching to Pressure Frying For fast-paced hospitality environments, efficiency is everything. Traditional frying methods have their place, but pressure frying provides clear performance advantages for busy venues. 1. Faster Cooking Times The pressurised environment increases heat transfer, reducing cooking times — ideal for peak service hours when every second counts. 2. Juicier, More Flavourful Food By sealing in moisture, pressure frying ensures fried food stays succulent inside while maintaining a crispy, golden coating. 3. Reduced Oil Usage and Lower Costs Shorter cook times mean less oil absorption, helping venues save money while delivering a healthier product. 4. Consistency and Reliability Commercial kitchens rely on consistency. The Henny Penny Pressure Fryer maintains precise temperature and pressure control for identical results every time — whether you’re cooking one batch or one hundred. 5. Higher Output, Better Profit Margins By improving cooking speed and product quality, pressure frying helps businesses serve more customers efficiently, boosting revenue and customer satisfaction. Why Choose Henny Penny Pressure Fryers from Hospitality Connect At Hospitality Connect, we supply the trusted Henny Penny range — renowned for its durability, innovation, and exceptional performance in professional kitchens. Designed for high-volume foodservice operations, Henny Penny fryers are perfect for restaurants, cafés, QSRs, and catering venues that demand reliable, efficient equipment. Our team can help you select the right pressure fryer and integrate it seamlessly into your kitchen layout for maximum productivity. Final Thoughts Pressure frying is redefining the art of fried food. With faster cook times, better moisture retention, and superior flavour, it’s no surprise that more chefs are making the switch. Investing in a Henny Penny Pressure Fryer through Hospitality Connect means more than just upgrading your equipment — it means elevating your food quality, improving your efficiency, and increasing your profitability. Hospitality Connect — your partner in smarter, more successful commercial kitchens.

The Ultimate Kitchen Equipment Checklist for Hospitality Businesses
A well-structured kitchen inventory list helps you track every item that keeps your restaurant running — from ingredients and consumables to the tools and appliances used daily. For many owners and kitchen managers, it’s easy to focus on perishable goods like meat, produce, and dairy. However, your non-edible inventory — including utensils, appliances, and kitchenware — plays an equally crucial role in controlling costs and maintaining consistency. Using an inventory template or budget planner, whether through Excel or a digital management system, helps you tie your equipment costs directly into your operating budget, reducing waste and improving efficiency. Kitchen Equipment Essentials for Every Commercial Kitchen Every hospitality venue is unique, and your kitchen requirements will depend on factors such as your menu, service size, and available space. However, this checklist covers the core equipment most restaurants, cafés, and catering businesses rely on daily. Cooking and Preparation Equipment Gas Oven: Perfect for baking, roasting, and braising. Convection Oven: Cooks up to 25% faster than traditional ovens. Deep Fryer: Delivers consistent frying power for high-demand service. Char Grill: Adds authentic smoky, charred flavours to meats and vegetables. Griddle: Ideal for breakfasts, burgers, and all-day menus. Soup Kettle: Keeps soups, sauces, and gravies warm during service. Microwave: A must-have for quick reheating and convenience. Coffee Machine: Essential for cafés and venues offering round-the-clock coffee service. Refrigeration and Storage Prep Fridge: Keep ingredients close at hand for quick service. Upright and Under-Counter Fridges: Store cold items efficiently. Freezers: For long-term storage and batch preparation. Holding Cabinets: Maintain temperature and freshness for service-ready dishes. Kitchen Shelving: Organise your workspace and optimise floor space. Food Storage Containers: Clear, labelled containers ensure accurate inventory counts. Food Trolleys: Ideal for transporting, clearing, and storing kitchen items. Small Appliances and Food Prep Food Processor: Chop, mix, purée, and grind ingredients with ease. Mixer: A versatile tool for baking, desserts, and dough preparation. Blender: Create drinks, soups, sauces, and smoothies effortlessly. Essential Kitchen Utensils Behind every successful chef is a set of reliable utensils that support consistent service and food quality. These are your everyday must-haves: Chef Knives: The backbone of any kitchen — invest in high quality. Chopping Boards: Colour-coded boards help prevent cross-contamination. Mixing Bowls: Multiple sizes for different preparations. Pots and Pans: A range of sizes to accommodate various cooking methods. Whisks, Spoons, and Ladles: For mixing, stirring, and serving. Turners, Lifters, and Spatulas: Heat-resistant tools for grills and pans. Tongs: For prepping, plating, and serving with precision. Measuring Sets: Ensure consistency and accuracy in every recipe. Graters and Peelers: Speed up prep time and improve presentation. Timers and Thermometers: Maintain hygiene, safety, and cooking precision. Can Openers and Squeeze Bottles: Keep operations safe and efficient. Building a Smarter, More Efficient Kitchen A well-planned kitchen is one that’s efficient, safe, and future-ready. Consider the flow between stations — prep, cooking, plating, and service — and choose multi-purpose equipment that helps maximise space while reducing energy costs. From Thermaster refrigeration and Waldorf cooking equipment to Robot Coupe food processors and Brice mixers, Hospitality Connect supplies a full range of commercial kitchen solutions designed for performance and reliability. Whether you’re fitting out a brand-new restaurant or refreshing an existing kitchen, our experts can help you choose the right combination of equipment for your space, menu, and budget. Final Thoughts Investing in high-quality kitchen equipment is more than just an operational decision — it’s an investment in your brand’s success. With the right planning, inventory tracking, and equipment selection, you can create a professional kitchen that supports consistency, efficiency, and exceptional dining experiences. Hospitality Connect is your trusted partner for premium commercial kitchen equipment across Australia.Explore our range today and take the next step toward a smarter, more profitable kitchen.

How to Plan a Seasonal Menu That Boosts Foot Traffic and Customer Loyalty
At Hospitality Connect, we know variety is the spice of life. For cafés, bars, and restaurants, introducing a seasonal menu is one of the best ways to delight your guests, stand out from competitors, and increase repeat business.But how do you start planning a seasonal menu that keeps both customers and your bottom line happy? Let’s explore how to design a successful seasonal menu strategy that works year-round. Why Create a Seasonal Menu? Adopting a seasonal menu is more than just a trend — it’s a strategic move for any hospitality business looking to grow. Here are the top benefits: 1. Create Powerful Marketing Opportunities In today’s competitive hospitality industry, keeping your offering fresh is essential. A seasonal menu launch gives you the perfect opportunity to run a creative marketing campaign, attract new customers, and re-engage regulars.Announce your new menu across social media, email, and in-store promotions to build excitement and anticipation. 2. Go Local and Highlight Fresh Ingredients Customers love transparency. By using local, in-season produce, you not only support nearby farmers but also offer a farm-to-table experience that today’s diners value. This approach can easily become your venue’s unique selling point. 3. Stay On-Trend and Relevant Seasonal menus help your business stay on top of evolving food trends. Whether it’s plant-based dining, locally sourced ingredients, or sustainable cooking, updating your menu each season keeps your brand aligned with customer expectations and current food movements. Want more marketing inspiration? Check out our guide: How to Market Your Hospitality Business for practical tips to grow your audience. Choosing the Right Seasonal Ingredients If you’re unsure where to start, begin with fresh produce that peaks each season. For example: Autumn: Apples, pears, plums, figs, and lemons — ideal for warm desserts and salads. Spring: Asparagus, zucchini, beans, broccoli, and cauliflower bring colour and freshness to any plate. Summer: Think tomatoes, sweetcorn, and berries for vibrant, refreshing dishes. Pro tip: Incorporating fruit and vegetables that align with the seasons also opens up opportunities to attract vegetarian and vegan diners.Explore our guide: How to Introduce a Vegan Menu to learn how to diversify your offering. Key Considerations When Planning a Seasonal Menu Before you make the switch, there are a few important factors to keep in mind to ensure a smooth transition. 1. Cost of Seasonal Ingredients Seasonal availability affects pricing. Always factor in potential cost fluctuations and communicate any price changes clearly to your customers. Transparency builds trust. 2. Staff Training and Preparation A new menu means new preparation methods and workflows. Start training your team early — ideally three to four months before launching — so they’re confident with new dishes and ingredients. 3. Marketing and Menu Launch Plan your marketing calendar around your seasonal change. Use high-quality photos, behind-the-scenes videos, and storytelling to showcase your upcoming menu. Increase social media activity in the weeks leading up to launch. 4. Printing and Décor Updates Don’t forget the small details. Budget for menu design and printing, as well as subtle décor changes to reflect the new season. Think cosy touches for winter or bright accents for summer. Make Your Kitchen Ready for Every Season To deliver your new menu seamlessly, your kitchen needs to be flexible, efficient, and well-equipped.Investing in multi-use commercial appliances like food processors, mixers, and prep machines helps streamline your workflow throughout the year. With the right equipment — from Thermaster refrigeration to Waldorf cooking ranges and Robot Coupe food processors — your kitchen can adapt effortlessly to every menu change. At Hospitality Connect, we supply the latest commercial kitchen solutions to help you run a more efficient, profitable, and innovative restaurant. Final Thoughts Creating a seasonal menu isn’t just about changing ingredients — it’s about refreshing your brand experience.By combining smart planning, local sourcing, and the right equipment, your restaurant or café can stay exciting and relevant all year long.

Gas or Induction Wok Cooker: Which Is Better for Your Commercial Kitchen?
In a commercial kitchen, every second counts — especially when you’re stir-frying, wok-tossing, or executing high-heat Asian dishes. The choice between a gas wok burner and an induction wok unit can significantly impact your speed, energy cost, kitchen environment, and even flavour. Today, we compare gas vs induction wok cooking, and highlight models from Scooker and Black Series to help you find the right solution for your operation. How Gas and Induction Wok Cooking Work Gas wok burners deliver heat via an open flame. They provide direct radiant heat to the wok body and allow chefs to see and adjust flame instantly. Induction wok cookers use electromagnetic fields to heat a compatible wok directly (rather than heating the burner or a flame). The cooktop itself remains relatively cool. Because induction transfers energy directly to the pan, its thermal efficiency is higher: less energy is lost to the surrounding air. Gas systems tend to lose more heat to ambient air around the pan. Key Comparisons: Gas vs Induction for Wok Cooking Feature Gas Wok Burner Induction Wok Cooker Speed & responsiveness Very fast heat-up, direct flame, instant adjustment Extremely fast heating, nearly instant response on many units Energy / operating cost Efficiency lower (often 40–60 %); more heat lost to air High efficiency (70–90 %) because energy is focused on the wok Taste / Wok Hei (flavour) Classic flame sear, smoky char, the traditional “wok hei” more easily achieved Modern induction can approximate it in many cases, though some chefs still prefer gas flame for nuance Kitchen environment More radiant heat, more ambient heat load, plus combustion byproducts Cooler kitchen, no open flame, safer environment, reduced indoor pollution Cost / capital & installation Often lower initial cost in existing gas kitchens; gas lines required Higher capital cost; needs adequate electrical supply (often three-phase) Cookware requirements Flexible — almost any wok material works Must be induction-compatible (magnetic stainless steel, cast iron) and good contact with surface Maintenance & cleaning Flame burners, grates, and burner ports need cleaning; more sooty deposits Flat surfaces are easier to clean, fewer parts, less sooting and residue Brand Spotlight: Scooker and Black Series Induction Woks Black Series (B+S / Black Induction Woks) Black Series offers induction wok units designed for professional kitchens. For example, their IN-W1-12-HS single-hole induction wok (12 kW) features a seamless micro-glass top, high-frequency heating coils, multiple power levels, and a stainless-steel frame. They also offer dual-hole induction wok units like their IN-W2-8 two-hole model (8 kW), suitable for kitchens needing more output. These units emphasize precise temperature control, ease of maintenance, and improved kitchen safety. Scooker (Hypothetical / Emerging Brand) While Black Series is more established in the commercial induction wok niche, Scooker (as a brand to feature) might represent newer or alternative models that compete on efficiency or price. For example, a Scooker induction wok might prioritise “smart” controls, modular design, or cost-effectiveness — though you’ll want to validate specifications like kW rating, build quality, and durability when sourcing. Cost Considerations & Return on Investment Capital Cost & Installation Gas wok burners tend to have lower upfront costs if you already have natural gas infrastructure. Commercial induction wok units are more expensive due to advanced electronics, induction coils, and required control systems. For example, Black Series’ induction units command premium pricing given their specifications. Additional electrical upgrades (e.g. wiring, panels, capacity) may be needed, especially for multiple induction units running at high kilowatts. Operating Cost & Efficiency Because induction recaptures more energy and delivers it directly to the cookware, it often results in lower ongoing energy costs — especially in modern electricity systems or in environments where fuel costs are high. In contrast, gas systems lose more heat to ambient air, meaning more waste and less efficient cooking. Over 3–5 years, the energy savings can offset the higher capital investment — especially in high-use kitchens. Cooking Speed, Control & Taste Speed: Induction often heats faster than or comparable to gas in many scenarios. In blind tests, induction has achieved faster water boil times across many hobs. Control: Induction gives fine-grained power adjustment, stable temperature hold, and instant responsiveness. Gas offers intuitive flame feedback but less precision in some ranges. Taste: Many chefs argue that gas flame produces superior “wok hei” — that seared, smoky flavour achieved with high heat. However, modern induction wok units (like Black Series) are engineered to approach that level of flavour with proper technique. In practice, a well-engineered induction wok combined with technique can deliver outstanding results — though for traditionalists, gas still holds appeal. Which Is Better? It Depends on Your Kitchen There is no one-size-fits-all answer. The best choice depends on: Existing infrastructure (gas lines, electrical capacity) Volume & frequency of wok cooking Staff skill and preference Long-term energy costs and sustainability goals Budget for upfront investment vs operating costs If your kitchen already has robust gas, a high-BTU gas wok burner might still be a strong choice. But if you’re building new or upgrading, induction (especially from reliable brands like Black Series) offers long-term efficiency, safety, and cleaner kitchen conditions. Summary & Recommendation Gas Wok Burners: Excellent for traditional flavour, immediate flame control, lower upfront cost (in gas-equipped kitchens). Induction Wok Units (e.g. Black Series, possibly Scooker): Superior energy efficiency, precise control, easier maintenance, cooler kitchens — though with higher capital and electrical demands. For high-output kitchens aiming for control, sustainability, and ease of operation, induction is increasingly becoming the future of professional wok cooking. But gas still retains strong relevance — especially for chefs devoted to classic wok technique.